

Follow @DistanceCovered on Twitter for more.
The RaumDiamond Idea
After searching for inspiration, the initial idea was provoked by none other than Johan Cruyff. In the footage I watched, Cruyff is asked to explain and draw the diamond formation using a chalkboard, but it turned out differently to what I’d expected. The screenshot below is what Cruyff drew, after stating “I play with a diamond like this”.

I’m aware the quality is awful, so apologies for that, but in the screenshot you can see his midfield diamond, and two wide strikers, with the defence not pictured. This is what triggered my idea, as my first thought was to wonder if a 442 diamond formation could be successful in FM with inside-forwards instead of strikers. I have to emphasise this point, as I’m aware some FM users create strikerless systems for the sake of it, and clearly, that’s not what I’ve done here.
After delving into the idea further, my memory recalled Brendan Rodgers’ time at Liverpool and how he utilised the 4-4-2 Diamond with Suarez and Sturridge. Those two strikers both had a great deal of freedom within that system, and depending on where the ball was Rodgers would allow one of the strikers to drift out wide.
Now, every tactical system has its advantages and disadvantages, but arguably the most vulnerable aspect of playing a traditional diamond is the open flanks that the opposition can exploit. As pictured below, the traditional 4-4-2 Diamond allows space for the opposing full-backs to advance into and move up the field.

However, if the strikers of the team playing the diamond position themselves wide, the opposing full-backs are less likely to make advances into the open space ahead of them due to fear and awareness of the strikers that’ll consequently be free right behind them. This is a key reason why Rodgers’ diamond at Liverpool was so successful, as it reversed one of the formation’s main weaknesses of open flanks, and turned it into a potential benefit by allowing a striker to drift into the space behind the advancing opposing full-back.
Overall, the inspiration provided by the Cruyff footage combined with my recollection of how Rodgers used the diamond at Liverpool, and thus my idea was born.
Constructing the Idea in FM
Once the idea was clearly defined, it was time to create the tactic in Football Manager, and this was tougher than I expected.
Formation, Roles & Duties
Firstly I’ll start with the formation, roles and duties, as shown below.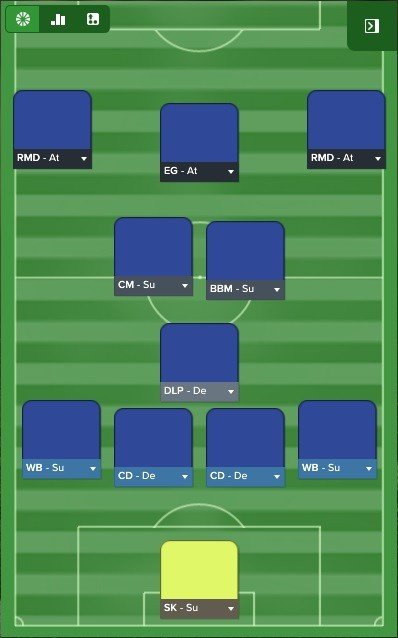
I’ve explained the thinking behind the formation and player placement earlier in the piece, so I won’t repeat myself.
Regarding each player’s role and duty:
SK (Support) – Sweeper Keepers should always be played with a high-line in Football Manager as well as real life, and although the defensive line in this tactic is Normal, this role will still benefit the team more than a typical GK.
CB (Defend) – No explanation needed for this role. A standard pairing of two centre-backs on defend duty.
WB (Support) – Two WBs either side who are both on support will give the tactic the necessary balance when attacking and defending. This role also effectively provides a clean slate in terms of PIs, presenting the opportunity to select the desired PIs of your choice. The PIs of both these players are set as Stay Wider and Run Wide with the Ball to provide width, as the rest of your players will largely be central. Width is vital for any tactic, as without it play will become congested and predictable in central areas. I’ve also selected the Cross Less Often PI, as due to the fact I’m not playing with any real strikers, I found that crosses were often being wasted.
DLP (Defend) – This role was a tough one as it is absolutely vital in a diamond system because it provides so much protection. I’m a big user of the Regista role, but because of the roaming tendency that comes with it, it wasn’t suitable. I had to select a role that was largely stationary to keep the diamond shape intact and to protect the defence, but I also wanted a dictator from deep. Thus, a DLP on defend duty was chosen, as the player in this role shouldn’t wonder too much from his position, and will also act as a commander of the ball from deep. Depending on the needs of the match, this role can change to an Anchor to be even more secure, and this is a useful switch against opponents that are man-marking or pressurising your DLP because he’s a playmaker. By changing the DLP to an Anchor, he’ll see less of the ball as your players will be less inclined to pass to him than if he was a playmaker.
CM (Support) – The CM on support duty provides an industrial work ethic that is very important for the ‘shuttlers’ in a diamond system. My expectations of the player in this role would include excessive energy to contribute to the attack and to retreat defensively to cover both the central areas and the full-backs to the side of them. The CM on support will provide what I want - an industrial and hard-working central midfield role that won’t be caught out of position too often due to the absence of PIs.
BBM (Support) – This role is a very important inclusion, and without it I found the tactic to struggle a lot more. The BBM contributes in a similar manner to the CM on support, but slightly differently. The BBM has a fixed PI, Roam from Position, which contributes positively as it adds movement and unpredictability to the attack. As the tactic is strikerless, the vertical movement of the BBM into goal-scoring areas with the Enganche can provide the breakthrough in certain matches. Although the two ‘shuttle’ midfielders have to be similar, I didn’t want to use the same role for each, as I wanted each of my midfielders to always be positioned differently from a vertical perspective in possession. In simple terms, I wanted my midfielders to be higher or lower than their teammates on the pitch so that the ball can progress up the field quicker by passing forwards rather than sideways.
Enganche (Attack) – The Engache role was chosen after testing the AP (Support) and the Trequartista (Attack). I basically wanted the role to be as close to a False-Nine as possible. The AP (Support) doesn’t allow the Get Further Forward PI, and I’ve never been a fan of the attack duty for that role. The Trequartista role incorporated too much movement into areas that I didn’t want my no.10 to be, as the diamond shape has the kept intact, so I need my no.10 to stay in familiar areas. Also the Trequartista has the fixed PI Move into Channels, and that wasn’t suitable as those channels are exclusive to my Raumdeuters. I eventually opted for the Enganche, a role that on reflection is quite perfect for the system. The Enganche doesn’t roam into channels, and mainly operates centrally to provide a link to the attack. The role allowed the selection of the Get Further Forward PI which was vital, as by doing that, opposing centre-backs are drawn to the Enganche which thus creates channels for my Raumdeuters to exploit.
Raumdeuter (Attack) – Finally, I opted for two Raumdeuters either side of my Enganche. I wanted to select a role that would let these two players operate almost as strikers, and I wanted a role that would exploit channels. Initially I used Inside-Forwards, but they didn’t operate how I’d expected them to, and they don’t run into channels. However, after reading up on the Raumdeuter role a bit more, it became apparent to me that the role was perfect, as they exploit space and channels by moving centrally and almost play as wide-poachers.
Team Instructions
The team instructions for the tactic are pictured below: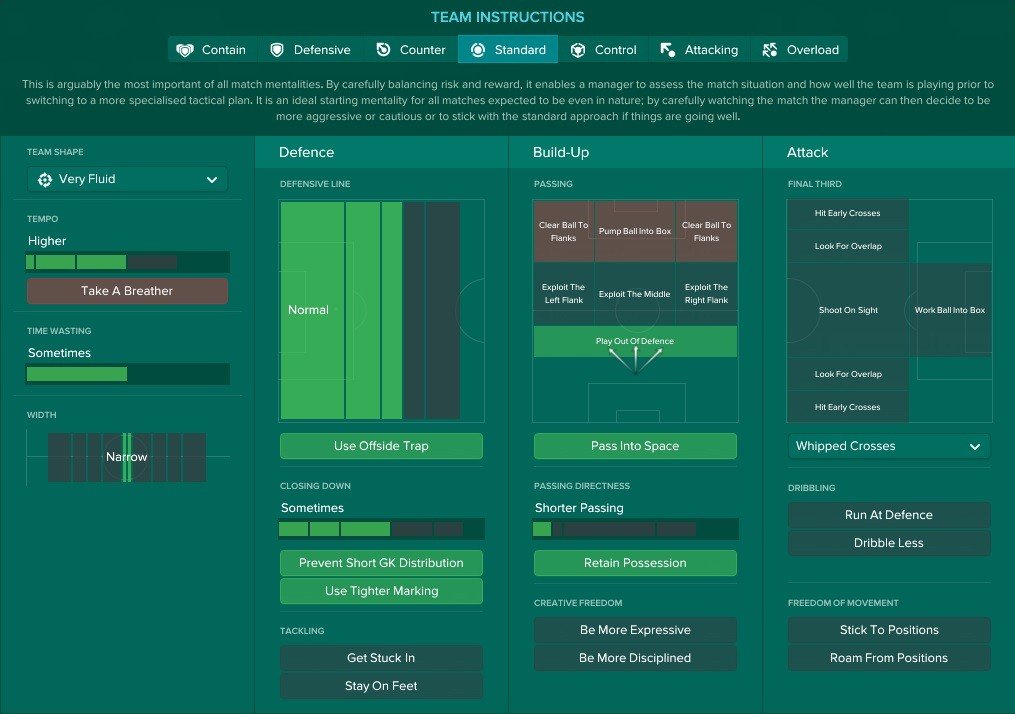
Firstly I’ll cover the general aspects:
Mentality: Standard – After playing with Control for a while, I’ve opted for the Standard mentality for this tactic. Mentality should be viewed as a risk barometer, and using Standard basically balances risk at 50/50, which is suitable for an already risky tactic of this nature.
Team Shape: Very Fluid – This is the team shape that I always try to play with, as it’s basically how I believe football should be played, as one compact team. Also, as my idea is strikerless and was inspired by the formation drawn by Johan Cruyff, I wanted to embrace aspects of Total Football, and Very Fluid is the shape for that.
Tempo: Higher – I’ve set the tempo as Higher for this tactic due to the mentality being Standard. By setting the mentality as Standard, the tempo naturally slows down in comparison to the Control mentality, so I made this change to counteract that. Also, due to the fact the diamond system offers a variety of passing options; players should be able to cope with passing faster than normal.
Width: Narrow – This was an important addition, as it influences how wide each Raumdeuter plays. As mentioned earlier, I want them to operate as wide strikers that drift centrally in possession, so to ensure that happens; I’ve set my width as narrow which will restrict how wide they’ll lurk. Depending on how the opponent is set, this can change to Balanced in order to widen the play or break down a narrow defence.
Now for the defensive instructions:
Defensive Line: Normal – This is once again related to the diamond system in that it’s not really a system that encourages a high line, it’s a system that knows what it’s good at. Also, due to the fact I’m playing with two Raumdeuters that will attack space in-behind, a defensive line that isn’t high can benefit that, as a quick transition can play them in.
Use Offside Trap – This isn’t a necessity as I’m not playing with a high line, but I opted to include it due to the quality of my defenders. If a team’s central defenders have strong attributes in concentration, anticipation, pace and acceleration, then they should be able to use offside traps to their advantage.
Closing Down: Sometimes – This was a tough decision, as I almost always employ high pressing, but with this system it wasn’t compatible. After testing a high pressing approach, it was clear that in a diamond formation it didn’t really work as it resulted in negative vulnerable situations more often than positives. Once I made the switch to lower closing down, the team appeared more balanced and stable without the ball, rather than being opened up too easily.
Prevent Short GK Distribution – This is commonly employed with a high line and a high pressing approach, but it can still positively affect a standard tactic. Even though the tactic doesn’t use either of those, it’s still a system that looks to dominate the ball. So, by preventing the opponent from building from the back, the opposing GK is more likely to hit long to into the middle whereby the diamond outnumbers most opposing formations centrally.
Use Tighter Marking – This TI is another that is commonly used for pressing, but again it can still benefit this system. Tight marking basically encourages your players to give the opponent as little time as possible to make advances by getting tight to them as they receive the ball. By pairing this with the Very Fluid team shape which reduces depth, the opposition players will often have little time and space to operate.
Now for the build-up instructions:
Play Out of Defence – This speaks for itself really, we all know what this TI does. I want to have the ball, so rather than hoofing it long, I’d want my attacks built from the back.
Pass Into Space – A very important inclusion, as this TI encourages through-balls. Through-balls are vital when making use of the Raumdeuter role, as the player in that role exploits space which can often be in-behind. I noticed a considerable difference when including this TI, especially with the tactic being strikerless, so vertical passing is imperative.
Shorter Passing – I want the majority of my possession to run through the diamond in the centre, and as my team shape is Very Fluid, my players are going to be closely linked together. Thus, Shorter Passing makes sense and works well with Pass into Space, as my players consequently play through-balls that are likely to be successful.
Retain Possession – This TI was a late inclusion, and some may say it conflicts with Pass into Space but that’s not the case. Initially I didn’t think this TI was needed, as the diamond is a system that naturally dominates the ball due to the central overloads. However, after watching a few full matches I wasn’t satisfied with decision making, and attacks were being forced more than I’d like despite the Shorter Passing TI. By including Retain Possession, this reduces the passing risks taken by your players which thus results in the ball being kept more efficiently. By reducing the passing risks of my players but also encouraging through-balls, it results in a healthy blend of possession and penetration.
In terms of attacking instructions, I’ve selected just one because I feel I’ve covered what I need in the previous areas.
The only attacking TI is Whipped Crosses – This is because I’m playing with no strikers but a lot of runners and space investigators, so by whipping crosses, the ball is likely to end up at the feet of one of my players on the edge of the area for example. Also, one more inclusion I tampered with was Dribble Less, as due to the fact I’m playing strikerless, I noticed players are often prone to dribbling their way towards goal rather than passing.
Opposition Instructions
Now for the opposition instructions, pictured below:

I don’t usually include opposition instructions in my tactical write-ups, as I believe that in most cases they depend on the opponent, but due to the fact the diamond is a very specific system, they have to be included here.
As the main vulnerability of the midfield diamond is the open flanks, the opposition instructions are largely focused towards managing that. As demonstrated in the screenshot above, each opposition wide man has to be closed down so that the team shifts towards the flank that the ball is on more so than normal. In addition to the closing down of opposing wide men, each wide man also has to be shown onto the foot that will force the play back into a central area which is where the majority of my players are. For example, if an opposing left-back is shown onto his left-foot, he’ll attack the left flank, whereas if he’s shown onto his right, he won’t be able to stay wide to run with the ball and will instead be forced to pass inside.
The only other opposition instruction that I employ is related to the STC, as if the opposition is using a player in this role, there’s a huge chance he’ll be a lone striker. Thus, I want any lone striker looking to link up, hold play or lead counter-attacks to be nullified, denied space and shut down immediately, and that remains throughout most of my tactic creations.
The RaumDiamond in the Match-Engine
To demonstrate how the tactic operates in the FM match-engine, I’ve took a few screenshots at various points during matches.
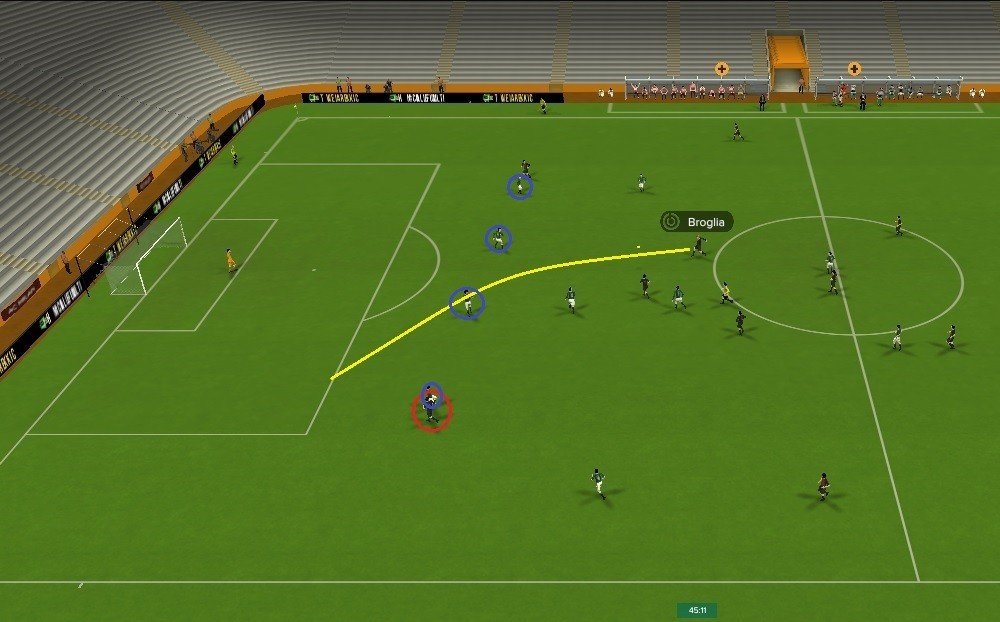
In the first example below, my Enganche has manipulated the right-sided opposition CB who has been drawn out to deal with him, thus disrupting the defensive line. Consequently, this creates a channel for the Raumdeuter to exploit and he’s played in by the Enganche for a scoring opportunity.

In the example below, the attacking build-up has recently started, hence most of my players being fairly deep. You can see my WBs supporting the attack on both flanks stretching the play, and the tight midfield diamond in the middle. Notice how high both of my Raumdeuters are, and they’re both ready to attack their inside channels. In this instance, despite the opposing defence being perfectly straight, my BBM challenges their higher defensive line by playing a ball over the top (Pass into Space TI) into the channel for my left Raumdeuter.
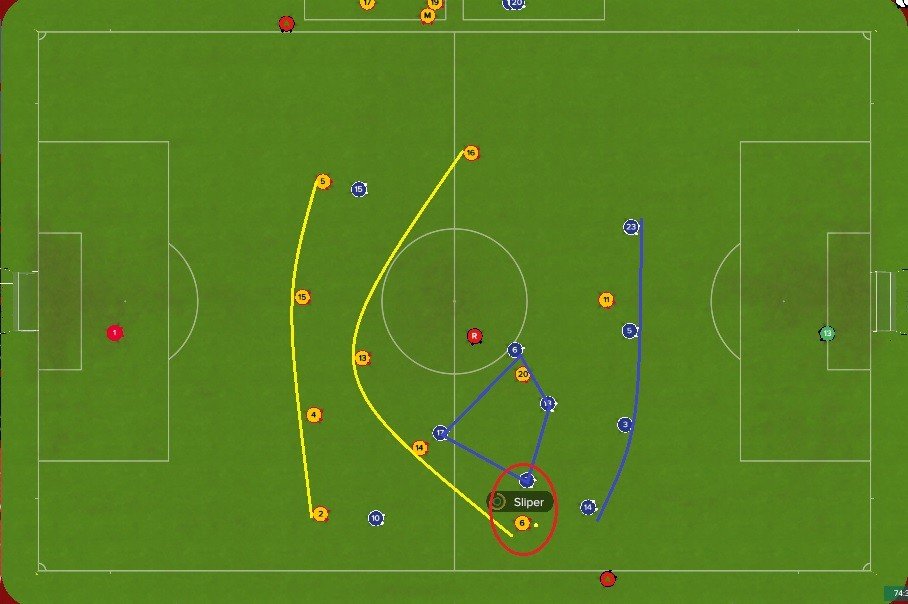
In the next example below, you can see a demonstration of how the system operates without the ball. The blue team is my team playing against the yellow 4-4-1-1. As the opposition wide man receives the ball, he’s closed down by the hard-working shuttle midfielder on that side, also notice the diamond midfield has shuffled over to the side that the ball is on. By my CM closing down the opposition winger, this allows my defensive line to remain stable and intact as the WB doesn’t have to move out of position.
The next example below, demonstrates how my Raumdeuters move centrally when my team is in possession, to act how I wanted as wide-strikers. In the screenshot, the ball is at the feet of Ouchi – my BBM who has advanced beyond my Enganche thanks his Roam from Position PI. He has the opportunity to play a through-ball to either the right or the left Raumdeuter who are both looking to run in-behind.

As a final example of how the tactic operates, check my video in the tweet below, which demonstrates the devastating link-up play between the Raumdeuters and the Enganche, as well as the importance of the Pass into Space TI.
https://twitter.com/DistanceCovered/status/884040119451299840
Summary
To summarise, I’m very satisfied with the idea and how it the tactic manifests itself within Football Manager. The RaumDiamond can combine fluid attacking play with a stable defensive foundation as long as it’s applied correctly and ESPECIALLY with the right type of players for each role.
I can’t stress enough how important it is to have the right players for this system if you’re going to use it. The RaumDiamond demands quality to work effectively, particularly in the front three positions, so employing this tactic to manage Grimsby probably isn’t the best idea. No tactic is perfect, but this tactic provides a unique but specific approach in comparison to most others.
Follow @DistanceCovered on Twitter for any help or guidance towards tactics or general aspects of Football Manager.


![FM26 Data Tweaks [v3.6 | v5.1]](https://fmdatatweaks.com/wp-content/uploads/fmdt-cover.webp)


Discussion: The RaumDiamond - FM17 Tactic
4 comments have been posted so far.
One little note if my memory serves well, BBM in the middle field will get a lot chances to score (mainly from the middle with long shots or not too close finishing chances), if you can get a player with little higher stats than usual, it might give you 8-10 goals a season. Thiago Maia has served me well almost every time in BBM (Please note it takes about 2-3 years for him to fully master the position, and that is only given that He is being played regularly)
The Raumdeuters are now working really good and are making lots of Goals. One of mine made 45 goals in one season