
This tactic is designed to achieve complete spatial dominance and overwhelming final-third overload. Operating on a high-intensity Gegenpress style within a fluid 3-4-2-1 structure, it creates an unplayable central box midfield while utilizing high wide outlets to stretch opposition defensive lines.
The core engine relies on a dual playmaker pivot that orchestrates the tempo, allowing a hyper-aggressive front three supported by dynamic, modern overlapping wide center-backs to completely smother opponents.
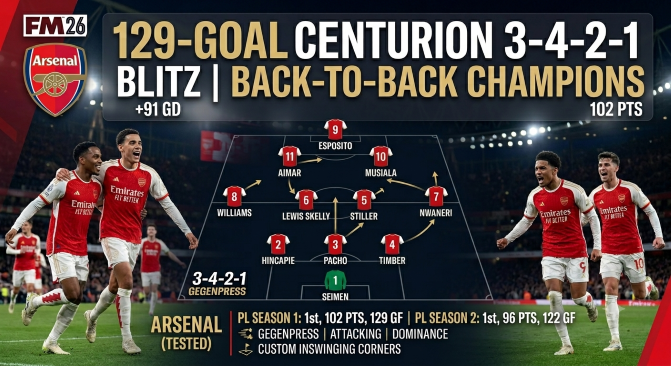
Formation: 3-4-2-1
Tactical Style: Gegenpress
Team Mentality: Positive
Key Focus: Extreme final-third chance creation, high-possession suffocation, and rapid counter-pressing transitions.
Verifiable Tested Results
This system delivered historically dominant numbers over back-to-back elite campaigns in the English Premier League with Arsenal:
Season 1: 1st (Champions) | 102 Points | 33W-3D-2L | 129 Goals For (+91 GD)
Season 2: 1st (Champions) | 96 Points | 30W-6D-2L | 122 Goals For (+85 GD)
The Lineup & Role Breakdown
Ball-Playing Goalkeeper (BGK): The modern sweeper-keeper acting as the first line of construction, initiating attacks from the back line.
The Back Three (OCB - BCB - OCB): A revolutionary defensive setup. The central Ball-Playing Cover Defender (BCB) anchors the line, while two hyper-mobile Overlapping Centre-Backs (OCB) step forward boldly into the half-spaces during build-up play.
The Double Deep Lying Playmaker Pivot (DLP - DLP): The brain of the team. Running a double DLP setup provides absolute stability, recycling possession cleanly, dictating the tempo, and shielding the center-backs.
The Direct Wide Outlets (W - W): Positioned wide in the midfield strata to hug the touchline, stretch the opponent's low block, and ping pinpoint crosses into the box.
The Dual Shadow Striker Menace (SS - SS): The absolute crown jewel of the tactic. Operating in the pockets behind the striker, these two space-invaders drop late, exploit channels, and function as high-volume inside goalscorers.
The Deep Lying Forward (CFD/DLF): Drops deeper to drag center-backs out of position, holding up the ball to feed the surging Shadow Strikers.
Team Instructions Breakdown
In Possession (The Controlling Blueprint)
Passing & Tempo: Shorter Passing combined with a Much Lower Tempo. This guarantees high possession retention, forcing the opponent to chase shadows.
Width & Progress: Much Wider Attacking Width to stretch defensive lines, while focusing progression through the Middle where our box midfield dominates.
Build-Up Strategy: Play Through Pressing paired with a strict instruction to Work Ball Into Box and Discourage Shots from Distance.
Creative Freedom & Dribbling: More Expressive freedom to break structure in the final third, paired with Encourage Dribbling to maximize 1v1 quality.
Goalkeeper Distribution: Distribute Quickly directly to the Centre-Backs to get the possession phase moving cleanly from deep.
Set Pieces: Play For Set Pieces to milk every single dead-ball advantage.
Out of Possession (The Suffocation Wall)
Defensive Lines: A High Press Line of Engagement coupled with a Much Higher Defensive Line to squeeze the pitch completely.
Pressing Intensity: Much More Often Trigger Press to hunt the ball immediately upon turnover.
Defensive Line Behavior: Step Up More to catch rushing forwards in offside traps and aggressively squash counter-attacks.
Tackling: Get Stuck In. High-intensity, physical reclamation of the ball.
GK Disruption: Prevent Short Goalkeeper Distribution to force long balls into our dominant back three.
Tactical Adjustments: Out of Possession Shapes
This tactic dynamically shifts its defensive blocks to entirely choke out the two most dangerous shapes you will face:
1. Against a 4-3-3 (The High Press Block)
The Trap: The AM acts as the designated press-trigger, stepping up right behind the CFD to cut off easy passing lanes to the opposition's defensive midfielder.
Midfield Suffocation: The dual CM pairing aggressively presses the central zone, while the wingers drop into the Wide Midfielder (WMF) strata to track opposition full-backs.
The Back Four Lock: The defensive line shifts into a rock-solid back four. The wide center-backs operate as Pure Full-Backs (PFB) to lock down the flanks against inside forwards.
2. Against a 4-2-3-1 (The Deep Anchor Pivot)
The Midfield Drop: Instead of pressing high, the AM drops deep into the DM hole, acting as a dedicated destroyer/screen right in front of the center-backs to completely choke out the opposition's #10.
Flank Protection: The WMFs remain disciplined on the flanks to prevent the opposition wingers from isolating your full-backs.
The Rest Defense: A triple-layered central wall forces the opposition to surrender possession or hit low-percentage long balls.
Elite Inswinging Corner Routine
This custom setup utilizes an Inswinger to whip the ball with maximum velocity toward the target zones, causing extreme panic in the six-yard box.
Delivery: Inswinger aimed for the Short Corner (look for a right-footer on the left flank, and a left-footer on the right flank).
A1 & A7 (Far Post Threat): Attack Far Post and Lurk at Far Post.
A2 & A5 (Near Post Overload): Attack Near Post and Lurk at Near Post to glance incoming balls inward.
A3 (Keeper Disruptor): Mark Keeper to physically disrupt their ability to claim incoming balls.
A4 & A6 (Central/Edge Erasers): Attack Ball from Edge of Area and Go Forward to collect half-cleared headers.
C1 & C2 (The Out-of-Box Safety Net): Come Short to draw out defenders, and Lurk Outside Area to collect over-cleared balls and recycle possession.
Key Squad Requirements
Shadow Strikers: Must possess high Anticipation, Off the Ball, Pace, and Finishing (e.g., Musiala profile).
Overlapping Center-Backs: Require solid Pace, Dribbling, and Work Rate. Do not use slow, old-school defenders.
Corner Targets (A1/A2/A3): Prioritize your tallest center-backs with high Heading, Jumping Reach, and Bravery.


Discussion: 129-Goal Centurion 3-4-2-1 Blitz
No comments have been posted yet..